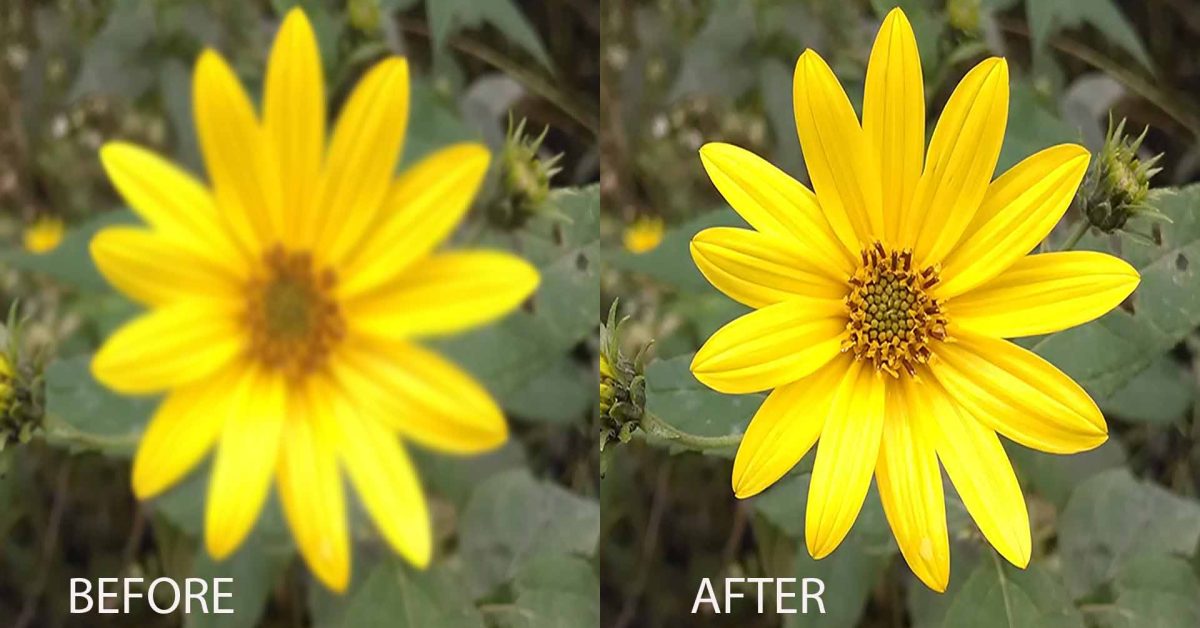
What would you do with a blurry picture? Especially if it is the only version that captures a special moment. In that case, the only course that you’ve got left is by using an image unblurring app or tool. Here we will find out how to unblur an image on iPhone.
However, if you are looking to deblur a photo that has been deliberately blurred or pixelated by a picture blurring app, then you won’t have much success. You blur or pixelate a picture by enlarging the pixels on a particular area of the photo until it is very visible. This will create a blurry effect. Unless you undo your work immediately, you cannot restore your image to the original image. What you can do instead is use a good photo editing tool and sharpen the photo to make it less blurry.
We’ve also covered a guide on how to blur license plate on iPhone, you can also check it out if you are interested.
How to unblur an image on iPhone using third-party photo editing apps
One way to make a picture less blurry is by using the sharpening tools of the photo editing tools. More advanced the photo editing apps, the better the results you are likely to get. Here we covered some of the best photo editing apps to make your picture less blurry. And we are going to find out how they do it.
Recommended Post: How to Delete an Album on iPhone.
Here are some of the apps to sharpen your blurry image on your iPhone:
- VSCO: Photo & Video Editor
- Snapseed
- Adobe Lightroom
- BeFunky
Here’s how to make a picture clearer on iPhone with the VSCO photo editor app
VSCO is a photo and a video editor combined into one app. With more than 200 tools and presets, it is also regarded as one of the best photo editing apps for the iPhone. What makes this app very different from other apps is how effectively you can only apply the many photo effects.
There are six different photo enhancement tools you could use to make your picture clearer.
And they are:
- Clarity
- Sharpness
- Contrast
- Exposure
- Fade
- Grain
Once you’ve launched the VSCO app, you need to open your blurry photo. After that, you need to apply the above-mentioned effects to your picture.
And here’s how to do it:
- Apply the Clarity and Sharpness effect to your picture. First, you need to apply the Clarity effect. And you don’t have to add too much of it. All you need to do is move the Clarity slider a little to the right. This will clear any big noise in your picture. Next, you need to add a little sharpness, and this will make your edges a little clearer. And you always increase the sharpness after you’ve applied clarity.
- Next, you need to add a little contrastand exposure to your image. First, you need to apply the contrast. This will make the lighter and darker sections of your photo stand out. Thus, making your picture clearer. After that, you need to add some exposure to your picture to balance the increase in contrast.
- This step is optional as, in most cases, usually, the above two steps are more than enough. However, for better results, you can even apply Fade and Grain effects to your blurry image. Adding fade and grain will make your picture’s blurriness appears intentional. So, if you don’t mind that, then you can go ahead and try them. Using fade and grain will give your image a weathered look and vintage look, as seen in many filters.
Here’s how to unblur a photo on iPhone with the Snapseed app
The next app on our list is the Snapseed app by Google. Although it is a free photo editing app, it is packed with a ton of features. So, if you are looking for an app that is completely free, then you could try Snapseed. You’ll get a decent result with this app.
If you want to make your picture unblurry with the Snapseed app, then you could try adjusting its Tune Image, Details, and Tonal Contrast. You don’t have to use all of them to unblur your image but tweak around with their many effects until you get your desired results.
Here’s how to use Snapseed to unblur your picture:
- The first effect you should try on Snapseed is the Details tool. With this tool, you need to add Sharpness and the Structure effect to your photo. These effects will make the most changes to your blurry photo. There is no fixed adjusting value, and it will depend on the picture you are using and the level of blurriness in it.
- Next, you need to apply the Tune Image tool. With this tool, you can control the brightness of your picture. By adjusting the contrast, brightness, saturation, ambiance, highlights, and shadows, you can make your picture slightly more clear.
- After that, you could try using the Tonal Contrast tool to unblur your photo. Using this tool is optional, and you only have to use it if you want to enhance even the smallest sections of your picture.
Here’s how to unblur an image on iPhone with Adobe Lightroom
Another best photo editing app for iPhone is Adobe Lightroom. Designed to make some serious enhancements to your photos, it is the best choice to unblur a photo on iPhone. Despite this, the user interface of this app is such that even a less experienced user can quickly get the hang of its features.
If you want to make a picture unblurry, then you’ll most likely need the Details tool. Under this tool, you’ll find many controls, which by tweaking a little, you’ll be able to make your blurry picture clearer.
Here’s how to do it:
Under the Details tool of the Adobe Lightroom, you’ll find four controls, and by adjusting them, you can enhance your blurry photo. You’ll need to use three of them and they are Sharpening, Radius, and Detail. The level of adjusting required depends on the blurriness of the picture and will change slightly because of that.
- Sharpening: Using this tool will make your picture clearer. Even the smallest detail will become more defined.
- Radius: This tool will sharpen the edges of your blurry picture. The higher the radius, the clearer the sharpness becomes. However, you need to balance it with the other filters.
- Detail: This tool will further enhance the sharpness of your picture. So, you need to increase the detail. Even the tiniest parts of your blurry photo, which were missed by the sharpening tool, will become clearer.
In addition, to these effects, you can also increase the Exposure and the contrast of your picture slightly. It depends on the results of your image and whether you need it or not.
Here’s how to unblur an image on iPhone with the BeFunky app
Another free iPhone photo editor app, BeFunky, offers some of the best tools to beautify your images. With this app, you can very easily deblur your photo on your iPhone. All you need is to apply their Sharpen and Smart Sharpen tools to your blurry picture. You can use the Smart Sharpen to clear the most blurry areas of your photo and the Sharpen tool to clear the less blurry section.
Steps on how to make a blurry picture clear on iPhone with the BeFunky app:
- First, you need to install the app if you haven’t done it already.
- Next, you need to launch the app and open your blurry photo.
- Then you can choose the Sharpen or the Smart Sharpen tool, depending on the blurriness of your picture.
- If the picture is very blurry, then use the Smart Sharpen or otherwise use the Sharpen tool.
- Once you’ve selected a tool, then drag the sliders to the right to increase their intensity. Try tweaking with the slider until you get a satisfactory outcome.
- After that, save your edited photo on your iPhone.